Sunday, September 18, 2016
Polymer Clay Artists Guild of Etsy (PCAGOE): Wonderfully Weird or Creepy October Showcase
Polymer Clay Artists Guild of Etsy (PCAGOE): Wonderfully Weird or Creepy October Showcase: Throughout the month of October, PCAGOE artists will be showcasing their progress exploring the theme: “Wonderfully Weird or Creepy” on t...
Thursday, August 25, 2016


Saturday, August 20, 2016
Polymer Clay Artists Guild of Etsy (PCAGOE): August 2016 Challenge winners "Seaside"
Thanks to my fellow members for placing my Bathing Beauty in second place.

Polymer Clay Artists Guild of Etsy (PCAGOE): August 2016 Challenge winners "Seaside": Top entries selected by the public 1. Sophisticated Seahorse Aquatic Writing Journal by Theresa of TheClayMonet 2. L...

Polymer Clay Artists Guild of Etsy (PCAGOE): August 2016 Challenge winners "Seaside": Top entries selected by the public 1. Sophisticated Seahorse Aquatic Writing Journal by Theresa of TheClayMonet 2. L...
Monday, August 1, 2016
Polymer Clay Artists Guild of Etsy (PCAGOE): August 2016 Challenge "Seaside"
Polymer Clay Artists Guild of Etsy (PCAGOE): August 2016 Challenge "Seaside": To see larger images visit : http://www.flickr.com/groups/1089891@N25/ For August; we are featuring the theme Seaside. Vote for yo...


Sunday, July 10, 2016
Polymer Clay Artists Guild of Etsy (PCAGOE): July 2016 Challenge winners "Music"
Polymer Clay Artists Guild of Etsy (PCAGOE): July 2016 Challenge winners "Music": Top entries selected by the public 1. Sound Wave Flute by Beth of CreateMyWorldDesigns 2. Music is my Second Langua...


Music is my Second Language Mixed Media by Arlene of HarrisonHollow

Song Birds - Nature's Music by Betsy of StrebeDesigns
Many thanks to everyone who voted, your support is always much appreciated. The members and the public were really in sync this time. The same artists took the same places in both groups!
Friday, July 1, 2016
Polymer Clay Artists Guild of Etsy (PCAGOE): July 2016 Challenge - "Music"
Polymer Clay Artists Guild of Etsy (PCAGOE): July 2016 Challenge - "Music": For July we are featuring "Music". Vote for your top 3 favorites. One lucky voter will be chosen in a drawing to win a gift c...


Tuesday, June 21, 2016
Song Birds Tiny Tin Shrine

I love Laurie Mika's shrines! For the second year in a row she has taught a wonderful class on shrines in the Polymer Clay Adventure Retreat and this year she taught subscribers how to make a tiny tin shrine from an Altoid tin! I was so excited to make one, and what came about is my Song Birds tiny tin shrine! Thank you Laurie!!
The majority of the decorative work is polymer clay framing the wonderful graphics by GalleryCat! (Thanks again to Laurie Mika for the reference to this shop). The beautiful birds are embellished with a few jewels and charms and titled "song birds" "chirp" and "tweet". This was so much fun, more to come for sure.
Oh! I can't share how I made this, because the retreat is a paid subscription. If you would like to learn how click here to the access the retreat sign up page. It is a great deal for $99, so many incredible artists. I find one of the best things about these seasoned artists is how they all share very helpful tips as well as their technique and creative genius. There is also a Quilted Adventure and an Art Jewelry Adventure ... so much fun!
Thursday, May 26, 2016
A Nightlight for Kim

I wanted to make a nightlight for my daughter who recently redid one of her bathrooms in blue and white. Integrating this month's PCAGOE's challenge theme "Quilling" was the perfect way to build a light with a delicate design.
I didn't really have a specific design in mind, except that it had to incorporate blue and white. I also wanted to give a try at a curved shape for the shade rather than my traditional flat shape. I started with Pardo translucent clay dyed with blue alcohol ink ... I didn't completely blend the ink into the clay giving the shade a slight marble look. For the quilling arrangement I used light green, white, and yellow Premo Souffle polymer clay. I also extruded a strip of coral, but ended up not using any of it, it took away the soft look I was after.

After cutting out a rectangle of the blue, I draped it over a can to cure. After that cooled, I added a thin layer of translucent liquid polymer clay to hold the strips as I applied them to the shade. I have never "quilled" polymer clay, and I can say there was a definite learning curve. But I persevered and built the pieces of the arrangement many times.
I am happy with the results, I think my daughter will be too! Here are off/on photos taken in one of my bathrooms.


Now it goes in the mail! Thank you stopping by and letting me share a little of this project with you.
Tuesday, May 24, 2016
Polymer Clay Earring 101 Tutorial

Monday, May 9, 2016
Polymer Clay Artists Guild of Etsy (PCAGOE): May 2016 Challenge winners "Negative Spaces"
Polymer Clay Artists Guild of Etsy (PCAGOE): May 2016 Challenge winners "Negative Spaces": Top entries selected by the public 1. Bubble teapot by Lisa of HiGirls 2. Faux Copper Butterfly Journal by Arlen...
Sunday, May 1, 2016
Polymer Clay Artists Guild of Etsy (PCAGOE): May 2016 Challenge - Negative Spaces
Polymer Clay Artists Guild of Etsy (PCAGOE): May 2016 Challenge - Negative Spaces: For May we are featuring Negative Spaces. Vote for your top 3 favorites. One lucky voter will be chosen in a drawing to win a gift cer...


Monday, April 11, 2016
Saturday, April 2, 2016
Very special gift boxes
Are you looking for a very special little box for the memorable gift? Take a look at my Limoges-style trinket boxes, veneers made from polymer clay and all are unique, can not be duplicated. Links to listings are under each photo.


Thursday, March 24, 2016
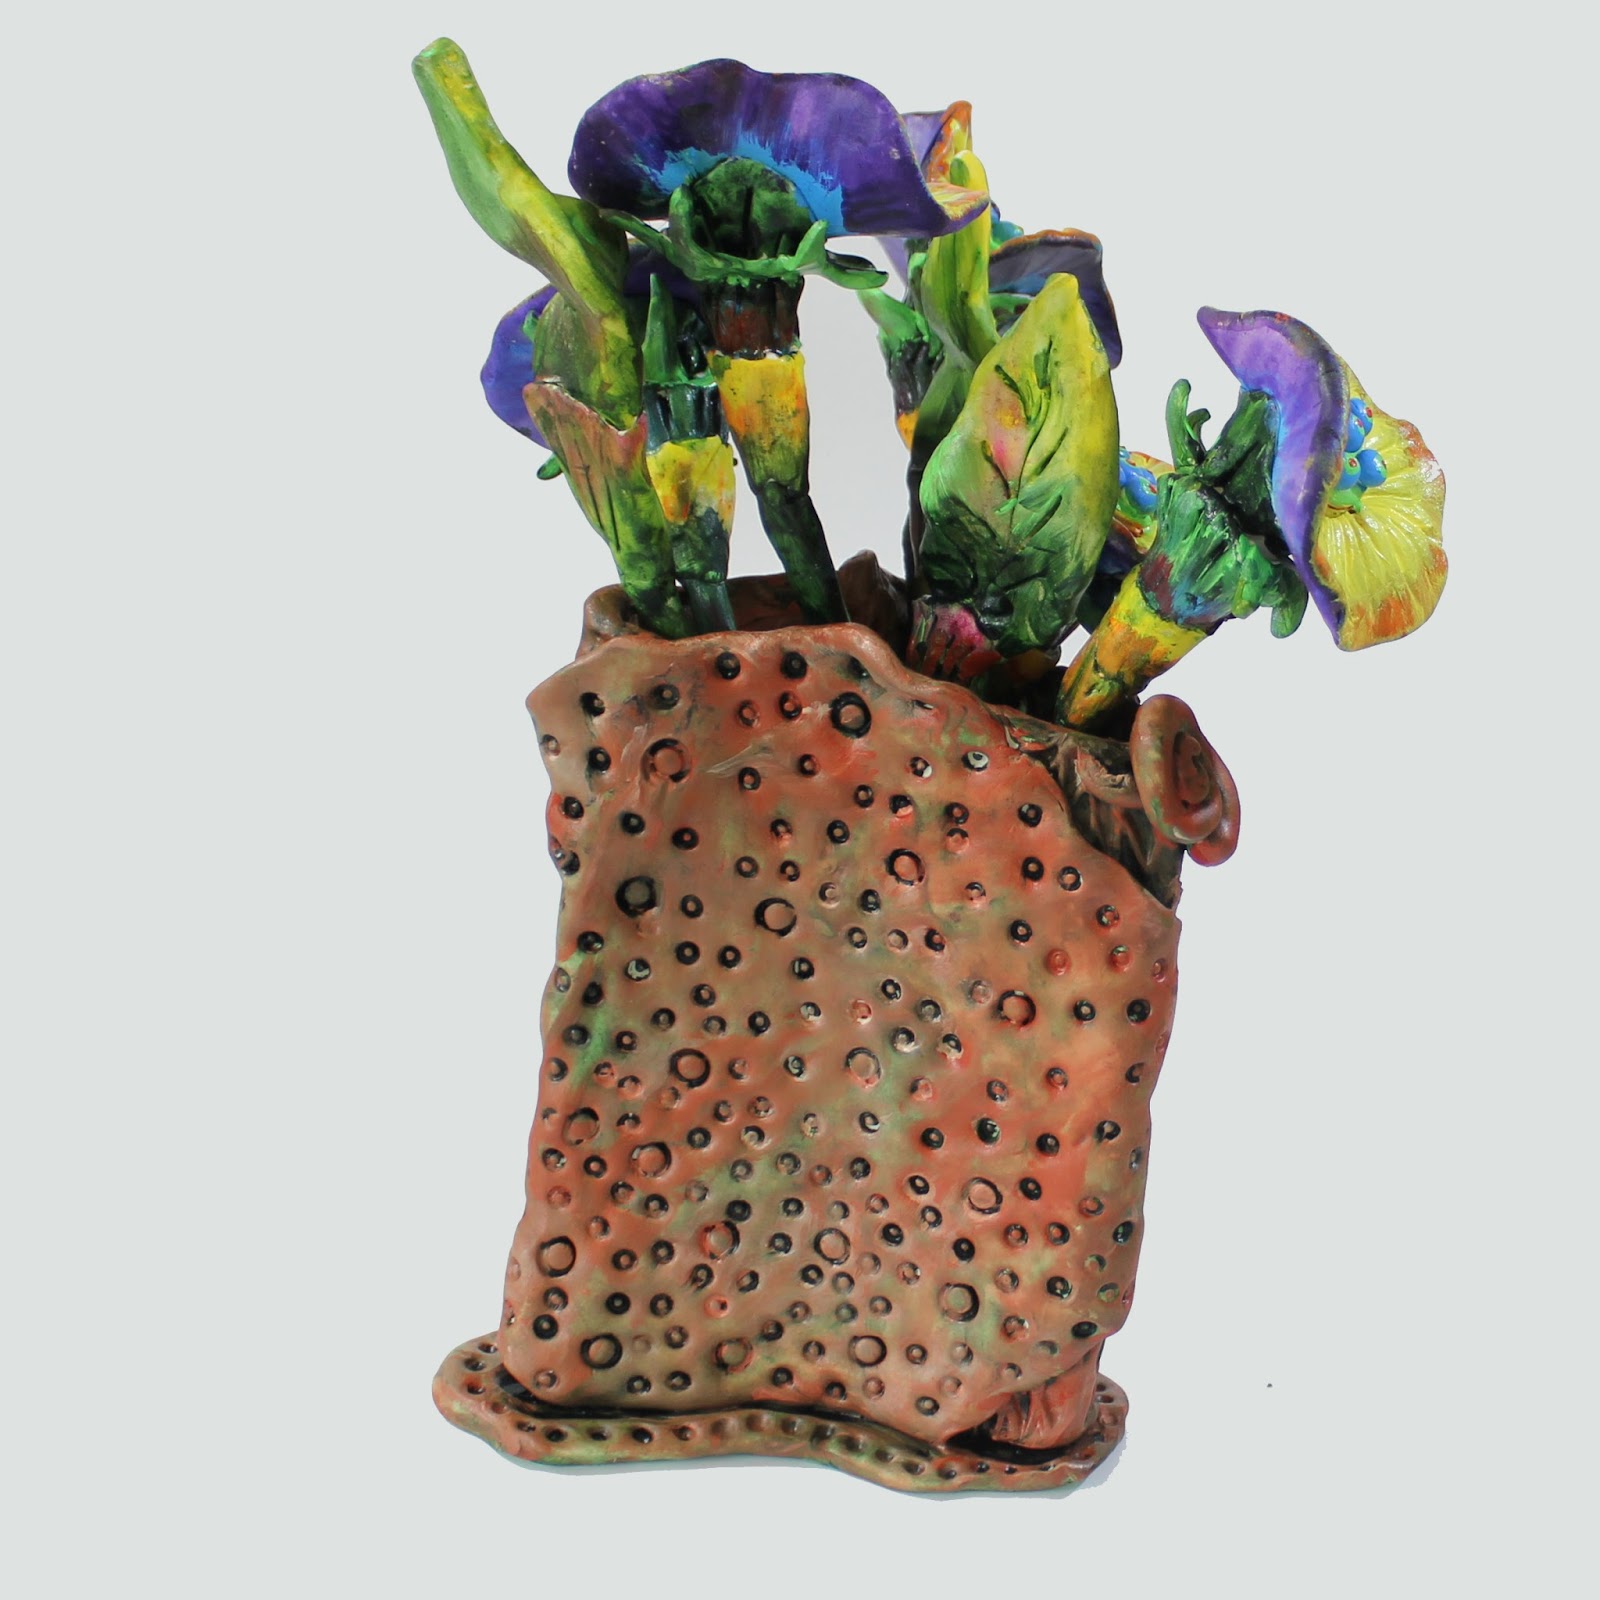
Whimsical Flowers and Vase

In the past year I have come to know the work of several polymer clay mixed media artists. I am drawn to their work because they produce color in their pieces with paint, ink, metallic, powders, chalk, etc. rather than using the colors of polymer clay. Additionally they introduce other elements such as boxes, tins and alters. Since I have painted in acrylics for over thirty years, I have a deep passion for what can be accomplished with paint. Given my recent passion for polymer clay it just seemed like it was bound to happen for me - combining polymer clay and acrylic paint.
Some of my favorite polymer clay mixed media artists are Laurie Mika, Doreen Kassel, Donna Greenberg and Lisa Renner. Be sure to visit their websites to see their incredible art pieces.
So when the time came to create an entry for the Polymer Clay Artists Guild of Etsy (PCAGOE) April challenge "Flowers", I knew right away I would sculpt and paint flowers, leaves and a vase. Inspired by all the artists mentioned and my total ignorance when it comes to real flowers (not to mention my inability to create them) my entry "Whimsical Flowers and Vase" came about. The flowers and leaves are strictly from my imagination, as far a I know flowers like these do not exist.
The arrangement is made from sculpted Sculpey Ultralight polymer clay and painted with artist's grade acrylic paints. It stands about 11" tall, and the flowers and leaves are removable for rearranging.
The process:
I made the flowers and leaves first without the stems, since the stems would be clay wrapped around wire. I also made several pods, but it turned out the vase was too small to hold everything, so I opted to leave them out. They looked a little like a boneyard at this point!

Stems attached and ready for painting. Some of the leaves and all of the pods are put aside for another day.

Testing my color choices on a leaf - and setting up to paint. The most messy and most fun part!

Flowers and leaves painted. I decided the flat centers were just too boring, so I added little balls to add some fun and depth. After much noodling, I decided to give an antique terracotta look to the vase. I had the perfect colors, Venetian red and titan buff, to mix in different amounts to vary the terracotta colors.

But first! A layer of deep hooker green to lend to the aging look.

More Views: The vase is three sided, here are the other two sides.

Thank you for visiting my blog. Your comments are always much appreciated.
Wednesday, March 9, 2016
Polymer Clay Artists Guild of Etsy (PCAGOE): March 2016 Challenge winners "Rings"
Thank you to my fellow members for voting my Blooming Ring in first place. It means a lot. Follow the link below to see all the winners, congratulations to all.

Polymer Clay Artists Guild of Etsy (PCAGOE): March 2016 Challenge winners "Rings": Top entries selected by the public: 1. Bold Orange Ring by Jackie of ThePleasantPheasant 2. Blue Millefiori Napkin Rin...

Polymer Clay Artists Guild of Etsy (PCAGOE): March 2016 Challenge winners "Rings": Top entries selected by the public: 1. Bold Orange Ring by Jackie of ThePleasantPheasant 2. Blue Millefiori Napkin Rin...
Thursday, February 25, 2016
Fun for Summer - A Blooming Ring

The theme for the March Polymer Clay Artists Guild of Etsy (PCAGOE) is rings. I decided if I made one, it was going to be colorful and whimsical! I had been working with !Premo color Opal and it was messy but produced beautiful results. For more transparency I blended it with Pardo Translucent. I dyed the clay with alcohol inks which I knew would give it bright colors.
The layers were baked individually and then combined with glue. I used 2 loops of finger-size memory wire for the band.

More Views:


Thank you for stopping by! Comments are always welcomed and appreciated.
Monday, January 25, 2016
Japanese Seasons Tool Holder

(click on images for a closer look)

Now on to build a tool holder with a little Japanese influence. I decided on a temple tower-like design, even though it would be an inefficient use of some of the space on the bottom. I cut a cardboard template; rolled out the sides on which I stamped a pattern. After curing, I antiqued them with black artists grade acrylic paint. (A real messy job!)

Next I constructed a support, in the shape I wanted, from heavy duty construction paper. Then I sealed the sides together with extruded lengths of a right-angle shape. I cured at this point so it would hold its shape for other work to come.

Next building the "bamboo" facade to cover the corners.

Well, I got so in the zone, I forgot to take any more photos! But I made the bottom from a thick and textured sheet of black clay, draped over a small square jewelry box lid to form the curve.
I wish I could say I did the Kanji calligraphy, and I have been practicing, but I am not very good at it yet. I was afraid that any small deviation of the characters could take the word in whole new (and possibly not desirable) direction. :) These are printed out from the web on photo paper, and coated with artists grade acrylic gel medium. They are mounted on black squares and trimmed with a black ribbon of extruded black clay. After curing, I glued them to the sides.
Pretty much the top trimming came about on its own. I didn't really have a plan until it started to happen.
Here it is, fitting in nicely with my other handmade tool containers. I decided to use it for all my small paintbrushes.

Thank you for stopping by! Sayonara!
Sunday, January 17, 2016
Polymer Clay Three-part Tool Holder Tutorial

These are very basic instructions for making a three-part tool container with polymer clay. They assume a knowledge of conditioning clay and working with an extruder. I hope you have fun, and use these steps to apply to your own style and techniques. The surface and trim can vary in many, many ways. A gallery is shown at the end with some ideas to get your creative juices flowing. Feel free to share and sell your work made from this tutorial. A reference would be nice tho!
Supply List:
3 toilet paper rolls
Aluminum Foil
7-10 oz. Polymer Clay - a firmer brand like !Premo
Viva Inka Gold paints (optional)
Bake and Bond or Liquid Polymer Clay
Sewing Thread or String
Tape - Like Scotch Brand
Tools:
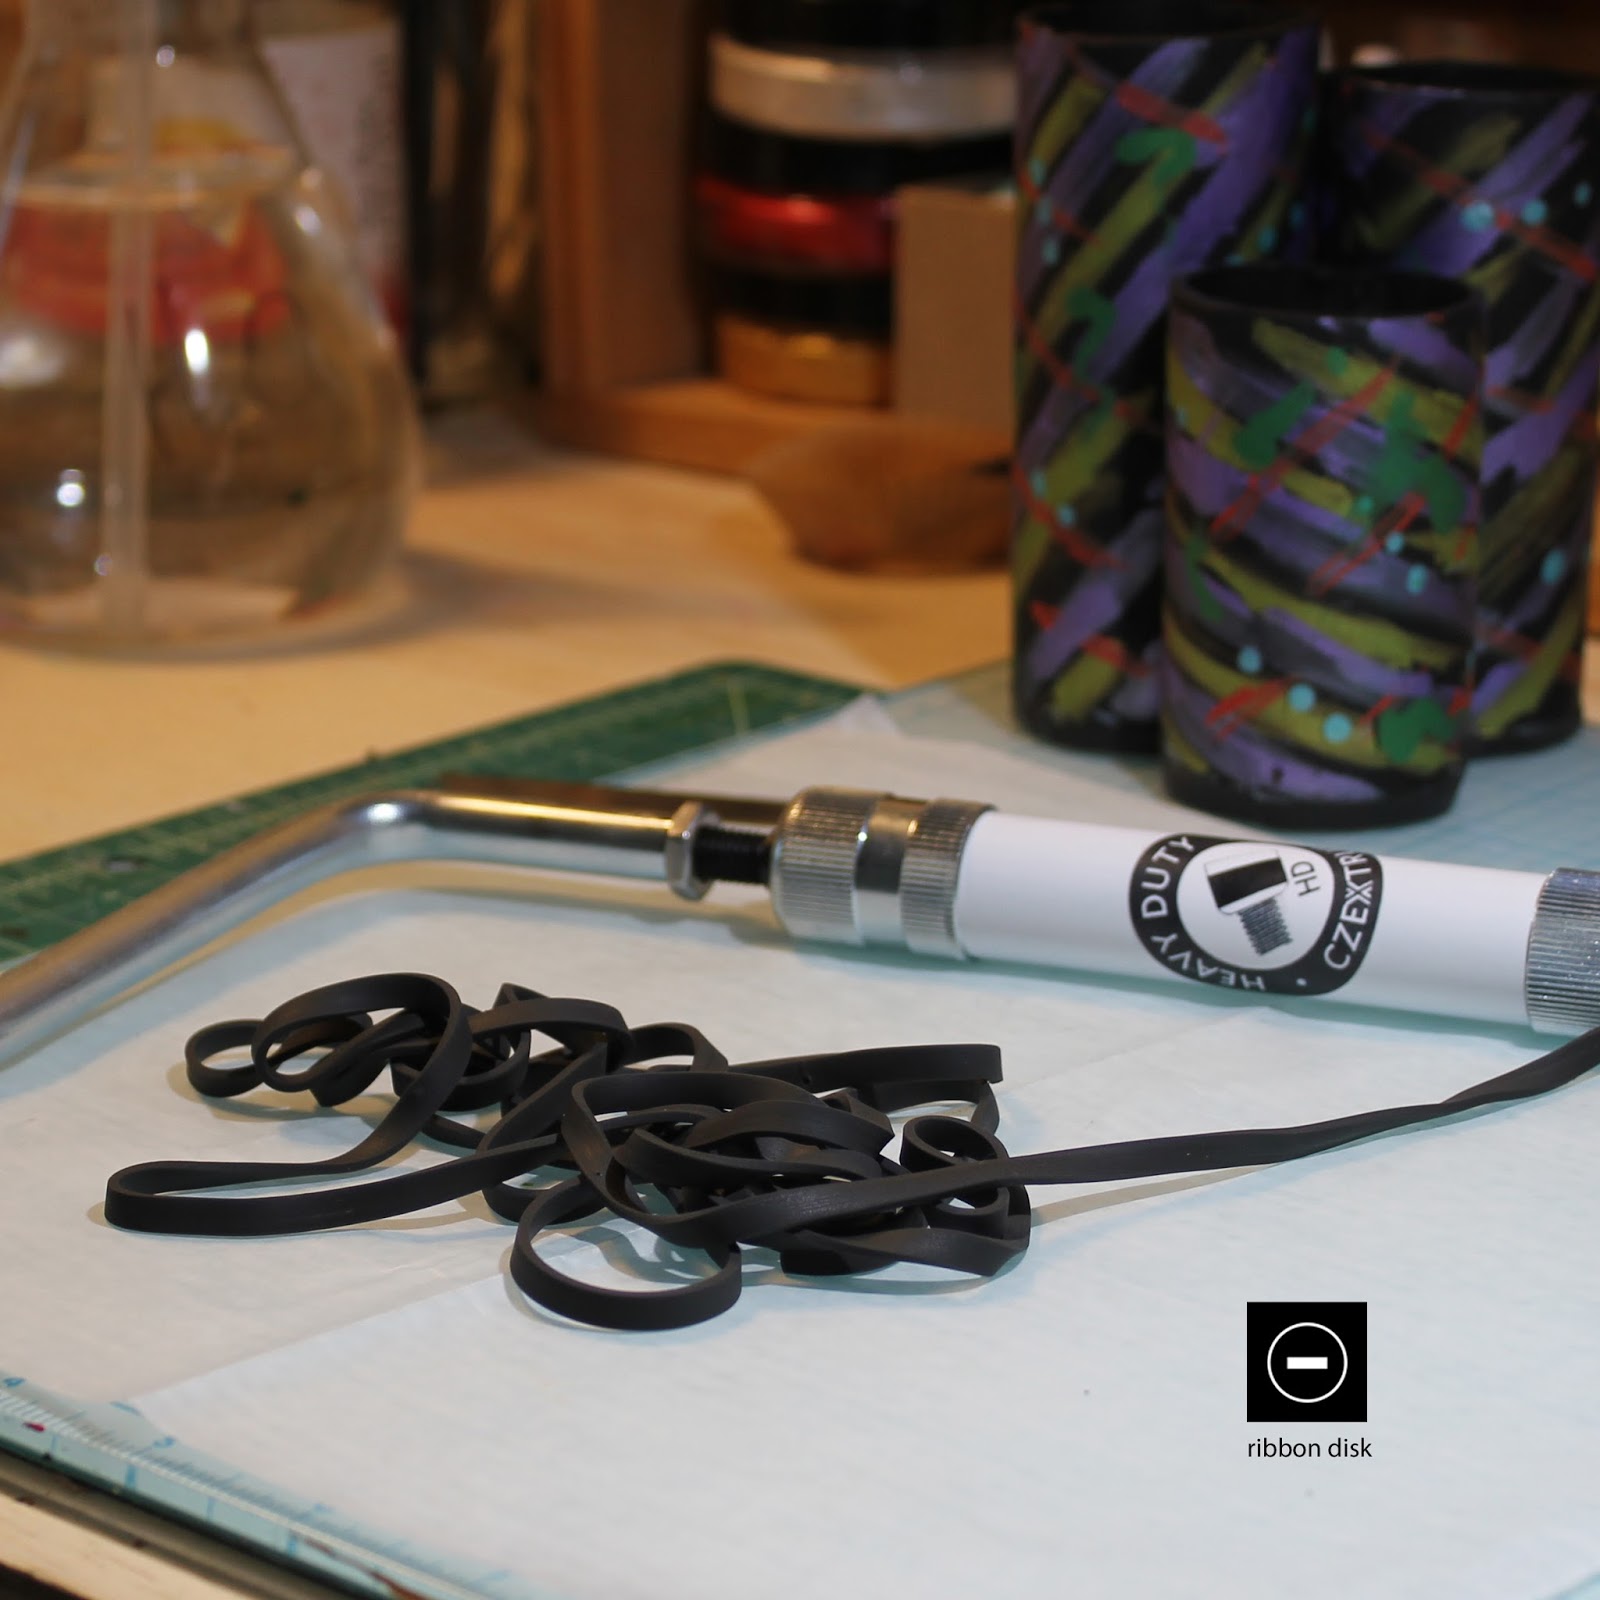
Pasta Machine
Tissue Blade
Extruder
Craft Knife
Tool for sealing raw clay seams - I use Christi Friesen's Gotta Have It tool.
Tool for dimpling the clay (optional)
Cut three toilet paper rolls to the desired height. I left one roll at the full length (approximately 4 1/2") and cut the other two at 4" and 3" heights. Cover each roll tightly with aluminum foil, folding the foil into the ends of the rolls. Tape the seams.

Condition and cut sheets of polymer clay to cover each roll. It will take 5 1/2" to wrap around the toilet paper roll. So your sheets should be 5 1/2" x (the height of your cut rolls). In this case the three sheets are 5 1/2" x 4 1/2", 5 1/2" x 4", and 5 1/2" x 3". I rolled these sheets at #1 setting on my Atlas pasta machine starting at #0. Here I painted each black sheet with Viva Inka Gold paints and let dry.

Cover each roll with the prepared sheets. Seal your seams tightly to make sure the seams close on the inside. I love Christi Friesen's Gotta Have It tool to seal seams.

Cure the rolls according to your brand of clay's instructions. Let cool and unfold aluminum foil from the inside of the toilet paper rolls. Twist the toilet paper roll inside the aluminum foil until it comes loose and can be removed. Set the toilet paper rolls aside for next time. Remove the foil from inside the cured cylinders.

Line up the three cylinders for connecting. On the tallest cylinder I place the seam to the back, on the other two I place the seam towards the middle touching the others.

Note (or mark on rim) where the three touch. Apply Bake and Bond to the touching points of all three.

Press the three together and tie tightly with thread or string. (sorry my only thread is dark and is hard to see). I wrap the thread around about three times and tie a knot making sure the containers are lined up correctly. Cure again for about 20 minutes.

When cured, remove the thread and proceed to make the bottom. Roll a sheet of clay, on the thickest setting of your pasta machine. Fold over for a double thickness. The sheet should be large enough to cover the entire bottom with some excess around the rim.

Cut off excess clay, and press the cylinders into the bottom to form an imprint of the cylinders in the clay.

Remove the cylinders from the bottom.

Fill the imprint with Bake and Bond.

Place the cylinders back on the bottom, lining up with the imprint. With a tissue blade, trim the clay flush with the sides of the containers. Hold blade straight up so the cut edge is on the same plane as the cylinders.

For the trim, extrude a long length of clay, using the ribbon disk (shape shown in photo).
Wrap the ribbon around the sides of the bottom of the cylinders, pressing into the intersections with your seam sealing tool.

For fun I added dimples to the ribbon on the bottom.

Apply Bake and Bond to the top edge of the cylinder (I find starting with the shortest works out the best).

Apply ribbon to the top of the edge over the Bake and Bond. Optionally press dimples here too.

Do the same steps for the remaining cylinders. And Cure for at least 30 minutes.

Cured, and ready for a little bling. I painted more Viva Inka Gold to the bottom and top ribbons and added a few jewels.

Tool Organizer put to work.

More organizers, the Gallery
 |
| One shelf in my work area - lots of learning mistakes, but they work! |
 |
| Here I used original Sculpey - not a good idea. It cracked in half during the first cure. Extruded ribbon came to the rescue to hold the pieces together. This is white clay, colored with alcohol and chalk inks. |
 |
| Three colors and three patterns from silkscreens. (silkscreens by Helen Breil and Tonja Lenderman) |
 |
| Same silkscreen pattern, different colors. (silkscreen by Tonja Lenderman) |
 |
| Same color of clay, different colors of metallic ink, different silkscreen patterns. (silkscreens by Helen Breil) |
 |
| Retro cane pattern with emblem. For this I did the cylinders in two layers, a base layer made of scrap clay. Then I applied a thin veneer of the retro cane pattern to the base layer before wrapping the toilet paper rolls. |
 |
| My very first (and largest) tool container. The sailboat on water is my own stamp design. |
Please post any questions or feedback in the comments section. Also I would love to see photos of what you create! Enjoy!
Subscribe to:
Posts (Atom)